How I Got a Band 6 in My Depth Study | Science Depth Study Tips
Depth Study Tips
Are you looking for tips and advice on your depth study assessment task?
One of the features of the new syllabus is undertaking a scientific investigation into an area of scientific interest. This can involve carrying out a depth study which can definitely be a daunting task, and with the broad and unspecific scope of the syllabus many students including myself initially did not know where to start or what topic to investigate.
In this article, we’re going to discuss:
- The purpose of the depth studies
- My tips for a depth study
Why do we do depth studies?
There are many different types of depth studies. For more information on the different types of depth studies, read this article.
My depth study involved planning and conducting a practical investigation and was a fantastic learning opportunity for gaining the essential scientific skills such as:
- Carrying out a practical experiment
- Collecting and analysing data
- Writing a scientific report
By taking part in this process, I gained an appreciation for the scientific process of developing an inquiry question, which allowed me to develop a hypothesis and design a valid experiment to test my predictions.
I recommend applying the following scientific method illustrated below in the flowchart
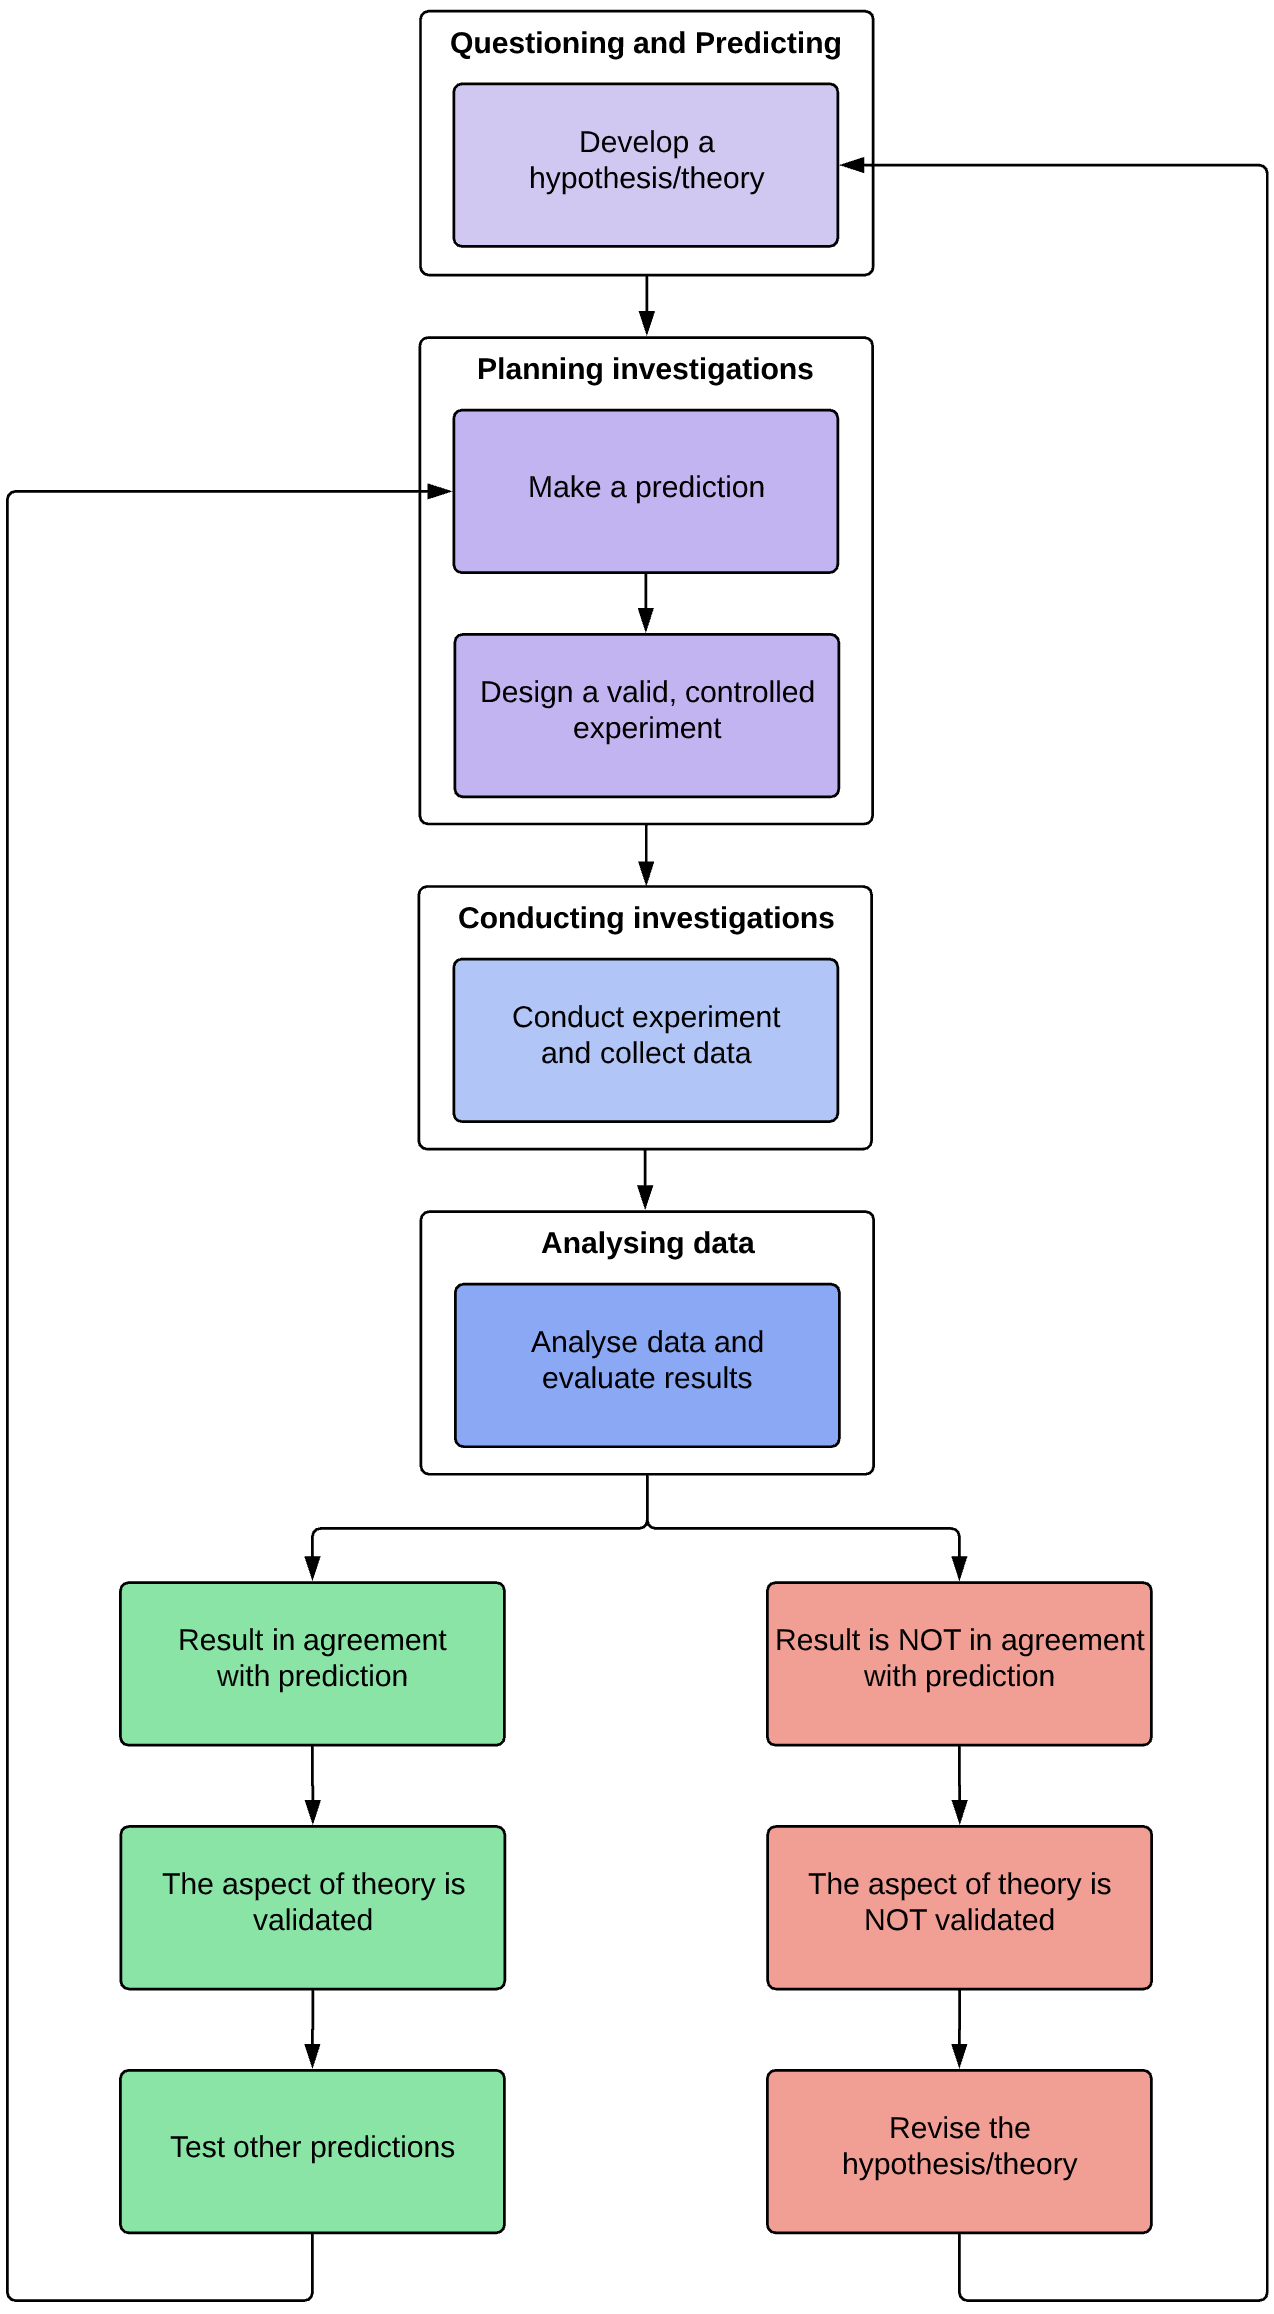
For more detailed explanation on how to apply the scientific method for your depth study practical investigation, read this article
My three main tips for acing a depth study
Making the most out of this learning experience can be achieved by adopting these three easy tips:
- Choose a depth study topic that interests you
- Be creative with your depth study
- Be open to error and failure within your depth study
Tip 1: Choose a topic that interests you
One of the main issues that students come across is not knowing what topic they want to research or investigate. This can lead to a lack of direction or inability to get started which can waste time.
Don’t choose a topic just to get high marks
Many students will fall into the trap of choosing a topic simply because it is either easy, or appears to have potential to yield a high mark due to its complexity.
This often does not have a beneficial outcome as the student will either produce an investigation that is not of very high standard, or will not be able to adequately produce the experiment due to its difficulty.
Interest in a topic will make the depth study investigation more enjoyable
The main way to overcome this problem is to choose a topic that genuinely interests you. If you undertake a depth study experiment that you do not have much interest in, it can become tedious, boring or unenjoyable.
For my depth study, I initially chose a topic that I felt would get me a high mark because it appeared complex. However I was not interested in the topic and this impacted my desire to carry out the experiment. This is why I made the decision to change my topic of choice to one that I was interested in and wanted to find an answer to the inquiry question that I posed. Having interest in my topic made it enjoyable to investigate, and this translated into my high mark.
Tip 2: Be creative with your depth study
It is unlikely that you are the first person to carry out the experiment that you have chosen to carry out, so it is important to think outside the box with the way that you design your investigation.
Innovation is key
The inquiry question of my depth study was:
Can we calculate the value of the permittivity of free space, ε0, by measuring the capacitance of two parallel plates with an applied voltage at varying distances apart?
This is an experiment that has been carried out many times before, so I had to be innovative with the way that I designed my experiment.
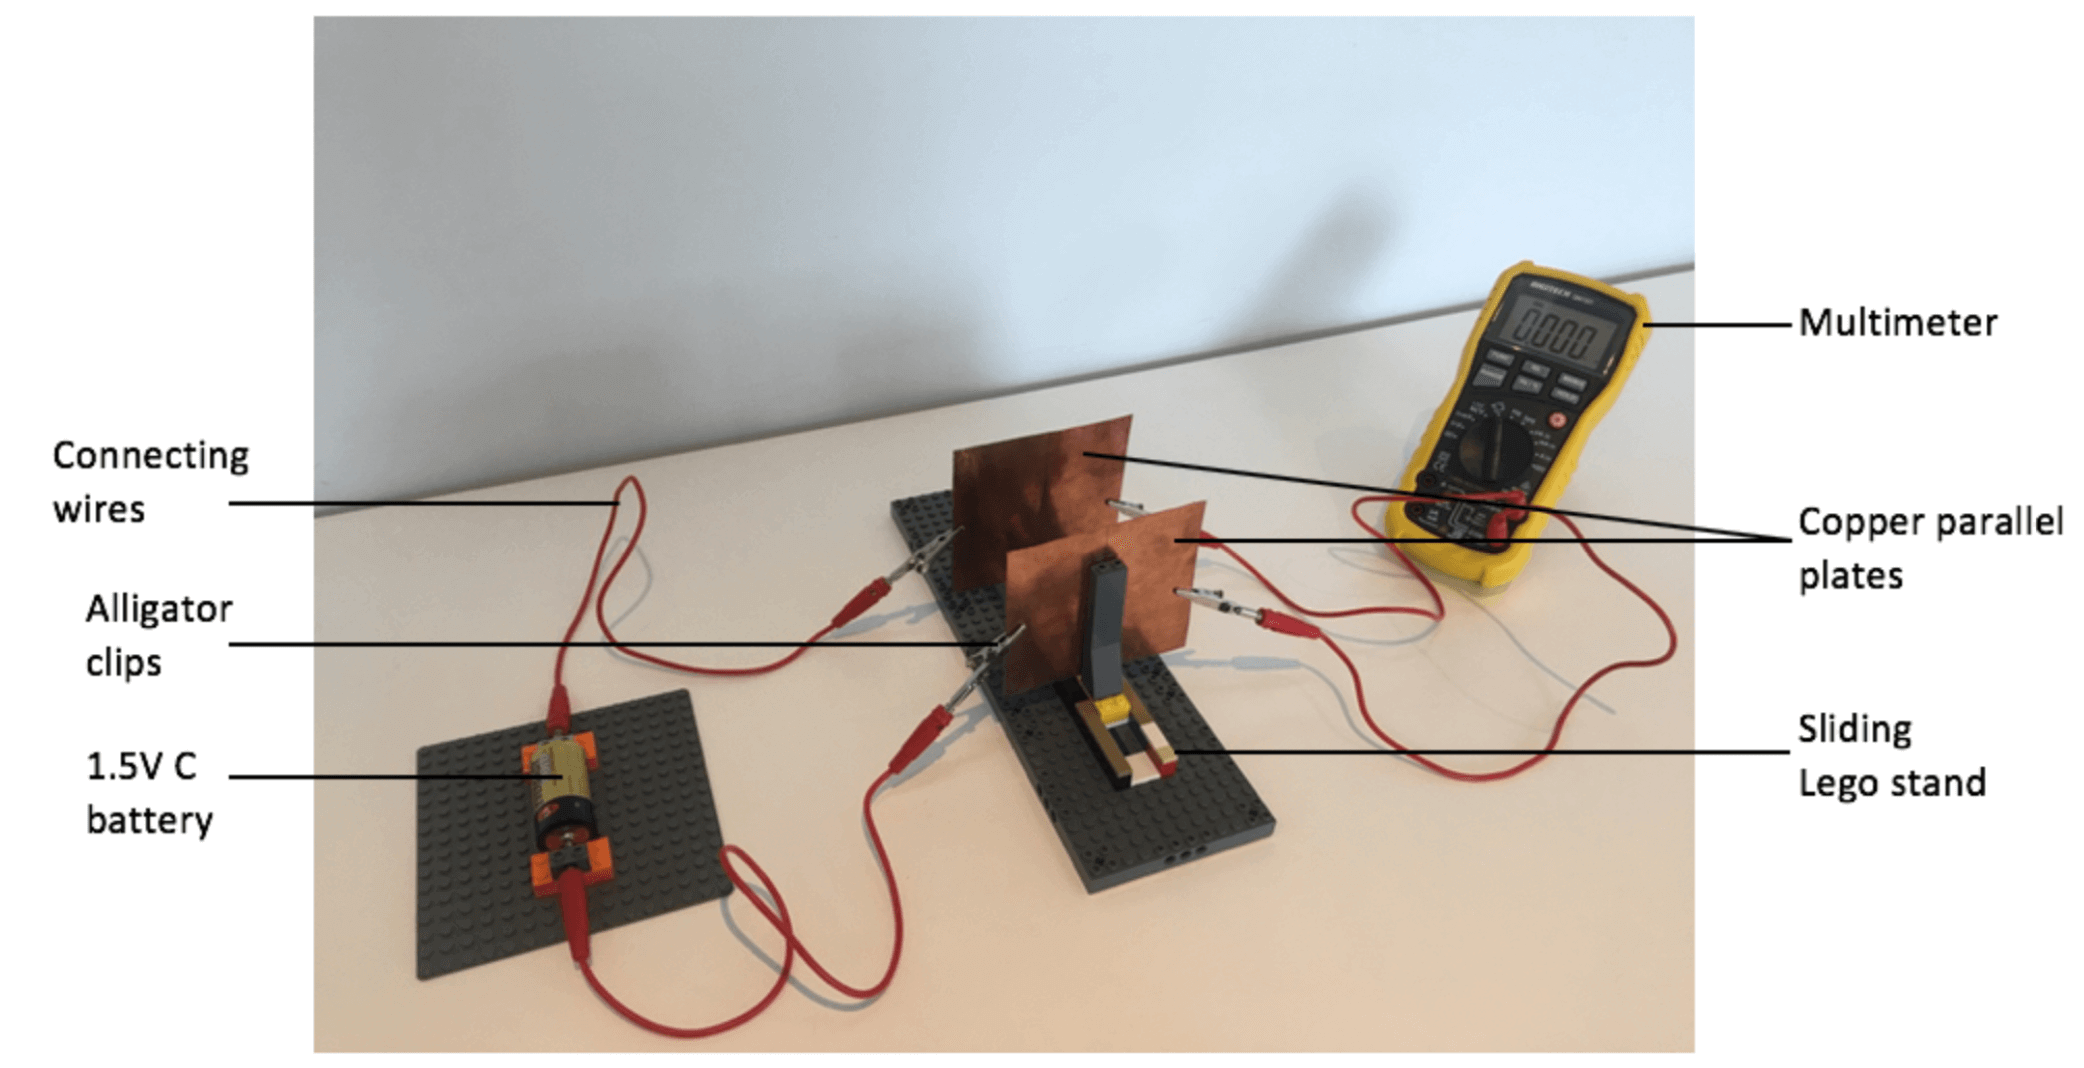
Due to the lack of adequate equipment that my school provided I had to be creative with how I constructed my apparatus in order to make it a valid experiment. This experiment involved two parallel copper plates that could be separated by varying distances, adjusted by a sliding Lego stand that I created.
Below is a photograph of the experimental setup for my depth study.
Creativity will separate you from your peers
Using Lego was a design that required thinking outside the box and separated me from my peers who relied on the limited supply of equipment provided by the school. Taking an innovative approach to your depth study is a major factor that will elevate your experiment, and will increase the depth of your investigation.
Be sure to include any innovative steps or adjustments that you make to your experiment in the method.
For example, in my method one of my steps was: The parallel copper plates were mounted, with blue tac, to a sliding stand constructed from Lego.
This made it obvious to the marker that I had undertaken a unique approach to my experiment.
Creative thinking goes beyond the experiment that you conduct
You can extend this innovative approach in the discussion by proposing ways to extend the experiment if it were to be carried out again. This can include modifying the independent variable or the equipment used.
For example, in my discussion I proposed that different materials could be placed between the parallel copper plates such as paper, plastic and glass which would give different values of permittivity. This gave my depth study a broadened scope of inquiry.
Tip 3: Be open to error and failure within your depth study
You’re experiment is not supposed to be perfect!
A trap that many students fall into is becoming obsessed with designing a perfect experiment that contains no experimental error.
The reality is that the equipment provided by your school or that you have sourced yourself is not ideal and will always be a source of error in your experiment.
Initially I fell into this trap where I became bogged down in the minor details of my equipment as I spent a large amount of time trying to make my parallel copper plates perfectly flat so that there would be no random error in the distances between the plates.
Error is a good thing
Upon conducting my experiment I found that this error was actually beneficial to my depth study as it allowed me to talk about these sources of error in my discussion and identify how to improve my experiment which is what teachers look for to award marks in a depth study discussion.
What’s important is being able to identify the error
The value of the permittivity of free space, ε0 , that I calculated was 2.13×10⁻¹¹ compared to the accepted value of 8.854×10⁻¹² which revealed a 42% error between my result and the accepted value. Despite this seemingly large discrepancy, I was not deducted marks for this as I was able to adequately identify where this error came from, and proposed methods of how to minimise it.
You are not being assessed on your results, but how you interpret your results
The table below is my thought process of how to identify sources of error, and propose methods of how to mitigate them.
Source of error | Reason for error | Proposed method of mitigation |
| Copper plates | Alignment of the two plates were not completely parallel since the plates were mounted with blue tac and had dents from trying to straighten them out resulting in random error. | Use copper plates that are thicker so that they don’t bend and dent as easily. |
| Humidity | Water is a polar molecule and in the presence of an electric field between two charged plates the molecules align with the charges on the plate opposing the electric field and the net electric field is reduced which increases capacitance, resulting in a systematic error | Perform the experiment in a vacuum to eliminate the presence of air molecules between the copper plates. |
| Vernier calliper | Small distance measurements made with calliper are not very precise due to the uncertainty of the millimetre increments, resulting in random error | Use a laser distance sensor to increase the accuracy and the precision for small distances between the plates. |
Identifying error is more important than your results
It is very important to understand that experimental error is by no means a bad thing, and in fact identifying the sources of error in a depth study is more important than achieving a desired results.
What I would’ve done differently
I achieved a mark of 31/35 for my depth study. Having gone through this experience, it made me realise that If I had the advice covered in this blog before I started, it would have elevated my mark to a 34 or 35.
I highly encourage students to consider the advice that I have shared in this blog to increase your chance of success in your depth study.
My three main pieces of advice are summarised below.
- Don’t choose a topic just to get a high mark, but choose a depth study topic that interests you
- Don’t be afraid to think outside the box with your depth study, but take on a creative approach as it will separate you from your peers.
- Don’t become obsessed with making your experiment perfect, but be open to error and failure as it will benefit the discussion of your depth study. Remember that you are not being assessed on your results, but how you interpret them
Looking for a depth study report template?
If you are unsure about how to write a practical report for your depth study, read this article, ‘How to Write a Practical Report: Depth Study Report Template’.
Written by Matthew Drielsma
Matthew Drielsma is a 2019 HSC graduate. He ranked first in physics at Cranbrook School and knows the new syllabus inside out.
Learnable Education and www.learnable.education, 2019. Unauthorised use and/or duplications of this material without express and written permission from this site's author and/or owner is strictly prohibited. Excerpts and links may be used, provided that full and clear credit is given to Learnable Education and www.learnable.education with appropriate and specific direction to the original content.